webpack | 2020-07-02 16:19:43 706次 0次
上篇从大体流程上介绍了 resolve 的过程,递归创建 module 模块,本篇继续分析,从 Compiler 中进入了层层回调,最终执行完再回到这里。
compile(callback) {
    ...
    //进入这个钩子的回调中
    this.hooks.make.callAsync(compilation, err => {
        if (err) return callback(err);
        //模块完成构建
        compilation.finish(err => {
            if (err) return callback(err);
            //编译(compilation)停止接收新模块时触发
            compilation.seal(err => {
                if (err) return callback(err);
                //seal完成意味着编译完成,钩子触发
                this.hooks.afterCompile.callAsync(compilation, err => {
                    if (err) return callback(err);

                    return callback(null, compilation);
                });
            });
        });
    });

}
接着执行了 finish 方法,给自身挂载上 modules 数据对象,存放 export 导出的模块,然后对被引入的模块进行错误收集处理:
Compilation.js
finish(callback) {
    ////addModule方法中添加 this.modules.push(module);
    const modules = this.modules;
    // FlagDependencyExportsPlugin -->  compilation.hooks.finishModules.tap
    // 将export的模块放入module.buildMeta.providedExports
    this.hooks.finishModules.callAsync(modules, err => {
        if (err) return callback(err);
        //遍历生成的module 进行错误收集
        for (let index = 0; index < modules.length; index++) {
            const module = modules[index];
            //针对被引入的模块进行错误收集
            this.reportDependencyErrorsAndWarnings(module, [module]);
        }
        //compilation.seal
        callback();
    });
}
接着触发 compilation.seal 方法,这里面触发了大量钩子:
seal(callback) {
    this.hooks.seal.call();
    ...
}
一、hooks.seal
WarnCaseSensitiveModulesPlugin 插件中注册,通过 CaseSensitiveModulesWarning 提示错误,开发中文件命名不区分大小写会提示错误,有多个模块的名称只是大小写不同,文件系统编译时,这可能导致意外行为。
二、hooks.optimizeDependencies
Tree shaking 相关:
① 如果配置 optimization.sideEffects 告知 webpack 去辨识 package.json 中的 副作用 标记或规则,以跳过那些当导出不被使用且被标记不包含副作用的模块。(注意 package.json 中 sideEffects 应该设置为 false 或者一个数组指定哪些文件包含副作用,确保不会被标记删除)
SideEffectsFlagPlugin:识别 package.json 或者 module.rules 的 sideEffects 标志(纯的 ES2015 模块),安全地删除未用到的 export 导出。这里只是打上 sideEffectFree 的标记。
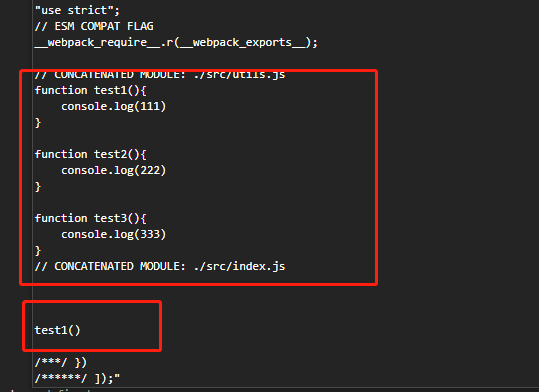
ModuleConcatenationPlugin (作用域提升(scope hosting),预编译功能,提升或者预编译所有模块到一个闭包中,提升代码在浏览器中的执行速度)比如有个文件中导出test三个函数,在另一个文件中引入test1方法,则经过此插件的处理变为这样接着给到 terser 处理。

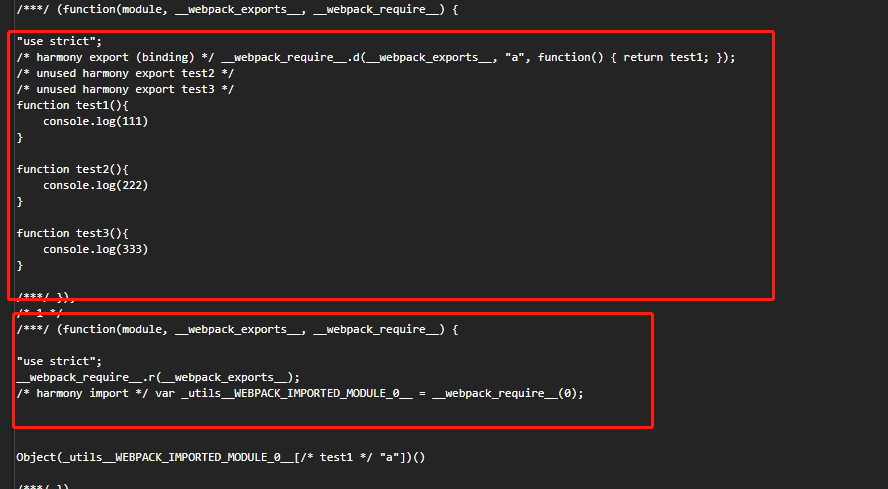
② 如果配置了 optimization.usedExports。produnction 模式默认添加,它告诉 Webpack 去决定每一个模块所用到的导出。有了它,会在打包产出里添加额外的像是 /* unused harmony export */ 之类的注释,依赖 UglifyJsPlugin 删除,现在是使用 terser 压缩。Harmony 是 ES6 和 ES2015 的代号。
FlagDependencyUsagePlugin:编译时标记依赖哪些模块被使用和未使用,压缩时去除,经过此插件处理后最后变为这样给 terser 处理,主要是 unused 的标识。

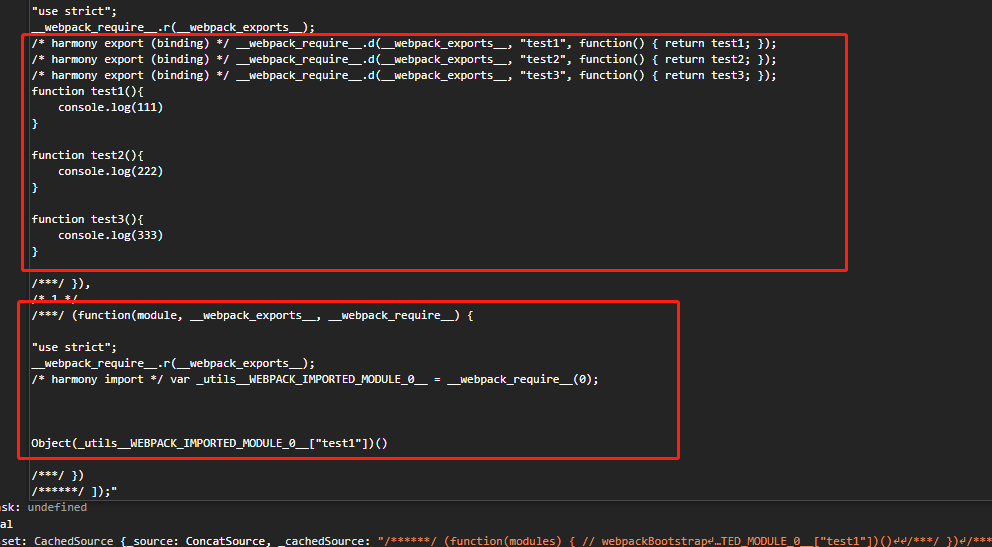
如果上述两个插件不使用的话则是默认全部导出,terser处理时认为不需要进行优化 shaking:

至于 terser 是如何做到这些的,暂时没有深入了解,摘抄大概的意思:
暴露出的 api 是 minify,minify 首先使用 parser 把源码转成 ast,然后 transofrm 这个ast
transform的过程中会递归调用每个节点的transform方法(节点有方法,这是terser的特点)
transform会首先optimize,也就是做各种转换,比如合并声明、对if (xxx) return; return;等冗余代码做精简,
然后如果是函数节点,在optimize之后会删除dead_code。
删除dead_code需要首先标记出used_id,需要从根节点开始逐步向下直到当前scope,记录所有的used_id,
然后就可以对没用到的做删除,但是函数调用有点特殊,
比如 a(); 只是调用了函数,没有做其他处理,这种是不能随便删的,
如果是console.log这种有副作用的函数删了就有问题,所以删除dead_code的时候需要区分出那些是pure的函数调用。
terser识别纯函数调用有两种方式,一种是代码里面加annotation,
比如/* PURE */,还有一种方式是在配置里面配置pure_functions。
babel编译过后的代码要由terser压缩,为了可以更好的删除dead_code,就需要在编译后的代码中加入/* PURE */。
minify --> parse + transform ---> optimize + drop_dead_code
这样的流程其中transform是定义在每个节点上的,再就是只有有scope的节点才会执行drop_dead_code,其余的只会optimize。
三、chunk 初始化
_preparedEntrypoints 中在 addEntry 时添加一个对象,遍历这个数组得到 chunk,即对应的输出文件(如果不考虑文件抽离单独打包的情况 bundle 和它是一一对应的关系),里面需要包含哪些模块(业务代码 module)。
this.hooks.beforeChunks.call();
// addEntry this._preparedEntrypoints.push(slot);
for (const preparedEntrypoint of this._preparedEntrypoints) {
    ...
    const chunk = this.addChunk(name);
    //每一个 entryPoint 就是一个 chunkGroup
    const entrypoint = new Entrypoint(name);
    ...
    // 创建关系  就是往对象中挂载
    GraphHelpers.connectChunkGroupAndChunk(entrypoint, chunk);
    GraphHelpers.connectChunkAndModule(chunk, module);

    chunk.entryModule = module;
    chunk.name = name;
    //模块深度
    this.assignDepth(module);
}
addChunk(name) {
if (name) {
//缓存中取
const chunk = this.namedChunks.get(name);
if (chunk !== undefined) {
return chunk;
}
}
//创建一个 chunk 对象,它是模块的集合单元
const chunk = new Chunk(name);
this.chunks.push(chunk);
if (name) {
this.namedChunks.set(name, chunk);
}
return chunk;
}这个过程完成后创建 chunk 与 entrypoint、module 之间的联系,chunkGroup 中包含多个 chunk,为下面创建 chunk graph 做准备。
三、buildChunkGraph
接着要处理 module 的相互依赖最终生成一个优化的 chunk 依赖图。先执行了 visitModules:
const visitModules = () => {
    ...
    const blockInfoMap = extraceBlockInfoMap(compilation);
    ...
}
const extraceBlockInfoMap = compilation => {
...
//包含的所有的 module
for (const module of compilation.modules) {
blockQueue = [module];
currentModule = module;
while (blockQueue.length > 0) {
block = blockQueue.pop();
//module 依赖的同步的 module
blockInfoModules = new Set();
//module 依赖的异步 module(block)
blockInfoBlocks = [];
//__resourceQuery
if (block.variables) {
for (const variable of block.variables) {
for (const dep of variable.dependencies) iteratorDependency(dep);
}
}
// 普通依赖的 module
if (block.dependencies) {
for (const dep of block.dependencies) iteratorDependency(dep);
}
// 动态 import 模块
if (block.blocks) {
for (const b of block.blocks) iteratorBlockPrepare(b);
}
const blockInfo = {
modules: blockInfoModules,
blocks: blockInfoBlocks
};
//blockInfoMap 上保存了每个 module 依赖的同步 module 及 异步 blocks
blockInfoMap.set(block, blockInfo);
}
}
...
}接下来回到 visitModules 继续执行:
while (queue.length) {
  //...
  while (queue.length) {
    //...
    if (chunkGroup !== queueItem.chunkGroup) {
      // 重置更新chunkGroup
    }
    switch (queueItem.action) {
      case ADD_AND_ENTER_MODULE: {
        // 建立chunk和module之间的联系 module 加入到 chunk
        ...
      }
      case ENTER_MODULE: {
        // 会在 queue 中新增一个 action 为 LEAVE_MODULE 的项会在后面遍历的流程当中使用
        ...
      }
      case PROCESS_BLOCK: {
        // get prepared block info
        const blockInfo = blockInfoMap.get(block);

        // Buffer items because order need to be reverse to get indicies correct
        const skipBuffer = [];
        const queueBuffer = [];
        //遍历包含的同步模块
        for (const refModule of blockInfo.modules) {
            if (chunk.containsModule(refModule)) {
                // skip early if already connected
                continue;
            }
            // minAvailableModules: (chunkGroup 可追踪的最小 module 数据集)  避免重复添加
            if (minAvailableModules.has(refModule)) {
                skipBuffer.push({
                    action: ADD_AND_ENTER_MODULE,
                    block: refModule,
                    module: refModule,
                    chunk,
                    chunkGroup
                });
                continue;
            }
            // enqueue the add and enter to enter in the correct order
            // this is relevant with circular dependencies
            queueBuffer.push({
                action: ADD_AND_ENTER_MODULE,
                block: refModule,
                module: refModule,
                chunk,
                chunkGroup
            });
        }
        ...

        // 遍历 blockInfoMap 里的异步模块 blocks
        for (const block of blockInfo.blocks) iteratorBlock(block);

        if (blockInfo.blocks.length > 0 && module !== block) {
            blocksWithNestedBlocks.add(block);
        }
        break;
      }
      case LEAVE_MODULE: {
        ...
      }
    }
  }
  while (queueConnect.size > 0) {
    ...
  }
  // 把queueDelayed 放入queue走while的最外层循环,目的的同步循环处理完后,然后才处理异步module
  if (queue.length === 0) {
    const tempQueue = queue;
    queue = queueDelayed.reverse();
    queueDelayed = tempQueue;
  }
}
同步的模块添加时状态设置为 ADD_AND_ENTER_MODULE ,方便下次循环添加进 chunk 中,异步模块执行 iteratorBlock,流程大概,下面这部分参考来源:chunk图生成,作者:肖磊
1. 调用addChunkInGroup为这个异步的 block 新建一个 chunk 以及 chunkGroup,同时调用 queueConnect 建立起这个新建的 chunk 和 chunkGroup 之间的联系。异步模块会输出一个 chunk,此时为空没有加入任何依赖的 module;
2. chunkDependencies 用于后面优化 chunk graph;
3. 向 queueDelayed 中添加一个 action 类型为 PROCESS_BLOCK,module 为当前所属的 module,block 为当前 module 依赖的异步模块,chunk(chunkGroup 当中的第一个 chunk) 及 chunkGroup 都是处理异步模块生成的新项,而这里向 queueDelayed 数据集当中添加的新项主要就是用于 queue 的外层遍历。
例如文件结构如下:
// a.js (webpack config 入口文件)
import add from './b.js'
add(1, 2)
import('./c').then(del => del(1, 2))

----------------------------------------------

// b.js
import mod from './d.js'
export default function add(n1, n2) {
  return n1 + n2
}
mod(100, 11)

----------------------------------------------

// c.js
import mod from './d.js'
mod(100, 11)
import('./b.js').then(add => add(1, 2))
export default function del(n1, n2) {
  return n1 - n2
}

----------------------------------------------

// d.js
export default function mod(n1, n2) {
  return n1 % n2
}这个过程完成之后可以得到如下关系依赖:entryPoint 包含了 a, b, d 3个 module,而 a 的异步依赖模块 c 以及 c 的同步依赖模块 d 同属于新创建的 chunkGroup2,chunkGroup2 中只有一个 chunk,而 c 的异步模块 b 属于新创建的 chunkGroup3。
接下来遍历 chunk graph,通过和依赖的 module 之间的使用关系来建立起不同 chunkGroup 之间的父子关系,同时剔除一些没有建立起联系的 chunk。最终当一个模块即为同步又为异步时,由于先执行同步,并且会被缓存起来,所以重复的模块会先保留同步的调用,剔除掉多余的异步引入。
大概的知道干了这些事,具体的详细代码并没有深入了解,有时间再补充这里,目前感觉有点啃不动。
四、chunk 优化
上面的部分粗略的看了下 chunk 的生成,接着 webpack 内部还有一些其他优化,回到 Compilation.js:
this.hooks.optimizeChunksBasic.call(this.chunks, this.chunkGroups)
插件定义在 WebpackOptionsApply:
1. RemoveParentModulesPlugin: 如果模块已经包含在所有父级模块中,告知 webpack 从 chunk 中检测出这些模块,或移除这些模块,由于构建性能问题下一版本会删除。
2. RemoveEmptyChunksPlugin: 移除空 chunk
3. MergeDuplicateChunksPlugin:合并含有相同模块的 chunk
4. EnsureChunkConditionsPlugin:?
this.hooks.optimizeChunksAdvanced.call(this.chunks, this.chunkGroups)
1. SplitChunksPlugin: 代码分割
2. RuntimeChunkPlugin: 页面修改后hash值变化相关
this.hooks.reviveModules.call(this.modules, this.records);
RecordIdsPlugin 设置了 module.id,初次发现这个里面的id全是 undefined,继续看下面这个
this.hooks.beforeModuleIds.call(this.modules);
NamedModulesPlugin 中通过 module.libIdent (来自 NormalModule.js )生成 module.id 为文件的相对路径。
接着又执行 this.applyModuleIds 也是设置 module.id,如果上面这个设置了此处就忽略,大致流程:
① 找到当前未使用的 id 和 已经使用的最大的 id。例如:如果已经使用的 id 是 [3, 6, 7 ,8],那么经过第一步处理后,nextFreeModuleId = 9, unusedIds = [0, 1, 2, 4, 5]。
② 给没有 id 的 module 设置 id。设置 id 时,优先使用 unusedIds 中的值。
然后根据 id 排序。
为什么需要这么多设置 id 的地方?原因是为了生成的文件后缀以及文件缓存相关,正常情况下通过 applyModuleIds 生成的文件 id 为数字,但是下次当代码中增加了一个模块,就会破坏原有的模块标识,所以采用相对路径(上面的方式,适用于开发环境)或者 HashedModuleIdsPlugin(hash 标识,生产环境),这样不会破坏原来的模块标识。
继续就是设置 chunk id,和上面类似:
this.hooks.reviveChunks.call(this.chunks, this.records);
this.hooks.optimizeChunkOrder.call(this.chunks);

this.applyChunkIds();
this.hooks.optimizeChunkIds.call(this.chunks);
this.hooks.afterOptimizeChunkIds.call(this.chunks);

this.sortItemsWithChunkIds();
五、createHash
上一篇中介绍的 hash 是给了 module 的 _buildHash 属性,这里的 hash 是最终生成的文件后缀,使用的都是同一个方法,创建 module.hash 和 chunk.hash:
createHash() {
    ...
    // module hash
    const modules = this.modules;
    for (let i = 0; i < modules.length; i++) {
        const module = modules[i];
        const moduleHash = createHash(hashFunction);
        module.updateHash(moduleHash);
        module.hash = /** @type {string} */ (moduleHash.digest(hashDigest));
        module.renderedHash = module.hash.substr(0, hashDigestLength);
    }
    ...
    //chunk hash
    ...
}
module 哈希创建时候和文件自身中相关的引入依赖会有关系,updateHash 在父类中触发遍历更新:
updateHash(hash) {
    for (const dep of this.dependencies) dep.updateHash(hash);
    for (const block of this.blocks) block.updateHash(hash);
    for (const variable of this.variables) variable.updateHash(hash);
}
继续创建 chunkHash:
createHash() {
    ...
    // clone needed as sort below is inplace mutation
    const chunks = this.chunks.slice();
    //排序
    chunks.sort((a, b) => {
        const aEntry = a.hasRuntime();
        const bEntry = b.hasRuntime();
        if (aEntry && !bEntry) return 1;
        if (!aEntry && bEntry) return -1;
        return byId(a, b);
    });
    //chunk hash
    for (let i = 0; i < chunks.length; i++) {
        const chunk = chunks[i];
        //此方法来自 crypto
        const chunkHash = createHash(hashFunction);
        try {
            if (outputOptions.hashSalt) {
                chunkHash.update(outputOptions.hashSalt);
            }
            chunk.updateHash(chunkHash);
            const template = chunk.hasRuntime()
                ? this.mainTemplate //生成项目入口文件
                : this.chunkTemplate; //异步加载的js
            template.updateHashForChunk(
                chunkHash,
                chunk,
                this.moduleTemplates.javascript,
                this.dependencyTemplates
            );
            this.hooks.chunkHash.call(chunk, chunkHash);
            chunk.hash = /** @type {string} */ (chunkHash.digest(hashDigest));
            hash.update(chunk.hash);
            chunk.renderedHash = chunk.hash.substr(0, hashDigestLength);
            this.hooks.contentHash.call(chunk);
        } catch (err) {
            this.errors.push(new ChunkRenderError(chunk, "", err));
        }
    }
    ...
}
updateHashForChunk 这个方法在 MainTemplate 和 ChunkTemplate 类中都有自己的实现逻辑:
class ChunkTemplate extends Tapable {
    ...
    updateHashForChunk(hash, chunk, moduleTemplate, dependencyTemplates) {
        this.updateHash(hash);
        this.hooks.hashForChunk.call(hash, chunk);
    }
};

//对应在 JsonpChunkTemplatePlugin 插件中
chunkTemplate.hooks.hashForChunk.tap(
	"JsonpChunkTemplatePlugin",
	(hash, chunk) => {
		hash.update(JSON.stringify(getEntryInfo(chunk)));
		hash.update(JSON.stringify(chunk.getChildIdsByOrders().prefetch) || "");
	}
);
class ChunkTemplate extends Tapable {
...
//webpack5 中 这个即将废弃 moduleTemplate and dependencyTemplates
//Updates hash with chunk-specific information from this template
updateHashForChunk(hash, chunk, moduleTemplate, dependencyTemplates) {
this.updateHash(hash);
this.hooks.hashForChunk.call(hash, chunk);
...
}
};
//对应在 TemplatedPathPlugin
mainTemplate.hooks.hashForChunk.tap(
"TemplatedPathPlugin",
(hash, chunk) => {
const outputOptions = mainTemplate.outputOptions;
const chunkFilename =
outputOptions.chunkFilename || outputOptions.filename;
// 文件名带 chunkhash
if (REGEXP_CHUNKHASH_FOR_TEST.test(chunkFilename)) {
hash.update(JSON.stringify(chunk.getChunkMaps(true).hash));
}
// 文件名带 contenthash
if (REGEXP_CONTENTHASH_FOR_TEST.test(chunkFilename)) {
hash.update(
JSON.stringify(
chunk.getChunkMaps(true).contentHash.javascript || {}
)
);
}
// 文件名带 name
if (REGEXP_NAME_FOR_TEST.test(chunkFilename)) {
hash.update(JSON.stringify(chunk.getChunkMaps(true).name));
}
}
);这里面还有很多的细节没有去深入学习,目前只是知道了大概,创建完 hash 后,下一篇开始创建资源并输出文件。
0人赞